

I came across Hexhog Tabletops completely by random a couple of weeks ago, on My Mini Factory, while doing some work on my own store. I certainly was not looking for another terrain system. Sally 4th sells game mats and Terra-Former kits for making 12″ square terrain tiles. In the past I have owned sets of two hex based terrain systems, which I have sold on, but something about this set really caught my attention. I can’t see myself printing enough pieces to fill a full size 8’x4′ wargames table, but for creating highly detailed ‘encounter tables’ for RPG / Skirmish games up to a 3′ square table for Pulp Alley or 7TV these tiles are ideal.

The tiles are just over 90mm across the flats and have a useful 30mm hex engraved into the tile. I have a very limited hobby budget, and when I discovered these, unfortunately August’s budget had been spent. Luckily for me Hexhog offer a free preview pack which is called ‘Campfire Confusion’. The terrain shown in this post only uses pieces from this free set, which can be downloaded by clicking here.
As well as the terrain pieces there is a document with a map and parts list that shows you how many of each part needs to be printed and how the pieces go together to form the landscape.
I have found the pieces very easy to print. I have printed mine on an Ender 5, which is a pretty basic sort of FDM printer, using PLA with a 0.2mm layer height. On average a terrain tile takes 3-4 hours to print, so it has been easy to print 3 or 4 tiles a day.

One of the issues with terrain systems is ‘continental drift’, i.e terrain tiles drifting apart. Hexhog have solved this with a two part solution that I rather like. As well as the terrain tiles they supply ‘frames’. These form the base of your terrain layout. They are held together using standard ‘OpenLock’ connectors. The terrain tiles then clip into the frames. There are half and quarter hex frames and tiles available in the range to fill your design out into a square or rectangle, if that’s what you want to do. As my favourite game is Pulp Alley, and that is played on a 3′ square table, I am planning to get a piece of board the right size and make a nice varnished wood surround to go around it and then keep the frame hexes in this permanently and just switch the terrain around from game to game.
How I painted and finished my Hexhog tiles

This is tile straight off the 3D printer. It has been printed at 0.2mm layer height on an Ender 5 printer using PLA filament. The tiles take 3-4 hours to print. I normally print 3 tiles at a time which takes 10-11 hours. This means I can print 6 tiles in a 24 hour period. PLA+ costs around £14 per Kilo. This tile weights 37g so costs around 52p in materials. Obviously the flatter tiles print even quicker, and cost even less!

The first thing that I do is to paint the tile all over with PVA glue. This gives a great surface for paint to bond to and also starts to fill in the layer lines on the print.

When the PVA has completely dries I paint the tile using Sandtex exterior masonry paint Bitter Chocolate. I have a big pot of this that I use for painting figure bases and priming al terrain and buildings. It is very tough, and a good base coat.

I am mimicking the technique that I use for figure painting with Speed / Contrast Paints. Miniatures get sprayed white and a dark brown ink wash is applied before painting to help with contrast. On terrain and larger items I do the apposite, painting brown and then drybrushing white to get a similar starting position.

Rocky areas are then painted using Citadel Colour Basilicanum Grey and earth areas are painted using Aggaros Dunes.

Once the contrast paint is completely dry, I give the tile a good drybrush using craft paint ‘Khaki Tan’ applied with a large make up brush (far cheaper than hobby dry-brushes!)

I use Gamers Grass tufts. I stick a few of those in place and then paint over all of the ‘earthy / grassy areas’ with PVA glue before sprinkling on my ‘flock’ which is a 50/50 mixture of dried, sterilised, sieved earth from the garden and Woodland Scenic Mixed Turf. When the glue has dried I spray the tile using Halfords Matt Lacquer.

One of the features that I really like are that the small hexes are quiet discrete unless you are looking for them. The hex tiles are 90mm across the flats. The tiles then have 30mm a/f hexes etched into surface.

If you would rather not have the mini hexes on your tiles there is also a set supplied without them. I like them. I will treat each mini hex as 1″ for movement and ranges in Pulp Alley and D&D and this will mean we do not need to use tape measures.

In this scene we see an encounter between two groups of primitive cave dwellers. Miniatures from Wargames Atlantic and Copplestone Castings.
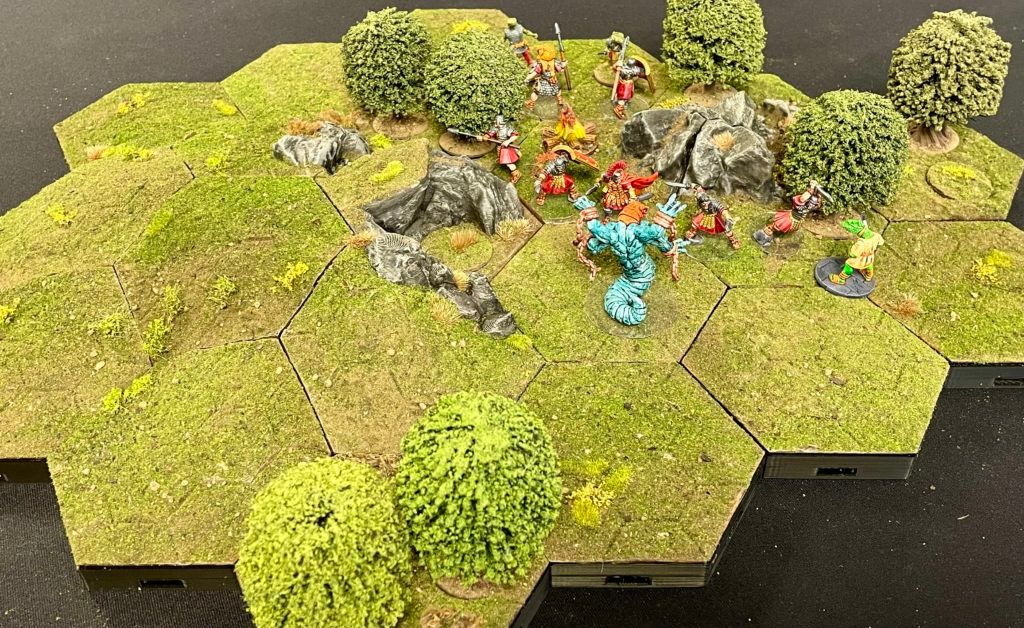
In the 2nd scene we see a group of Roman Legionaries from Modiphius Cohors Cthulhu fighting for there lives against some unearthly horrors.

The last 28mm scene shows a D&D party being attacked by Gnolls. Miniatures from Otherworld and North Star.

Here we see the same piece of terrain repurposed for 6mm / 10mm gaming. One of the other great features of Hexhog terrain is that a number of tiles have indentations to take round disks that trees or other small terrain items can be mounted on. Trees particularly give a sense of scale so I mounted a set of small 28mm scale trees and a set of 6 / 10mm trees to give an impression of how the tiles look in both scales.

In this scene we have some British and Soviet Cold War forces, based up for Seven Days to the Rhine deployed. You would of course need 3′ or 4′ square of this terrain to play this sort of game, but I think it would work quiet well. The only issue is that at the moment Hexhog terrain have only sculpted 28mm scale roads, but maybe if enough 6mm & 10mm gamers start using the terrain and ask for it they will make some nice single and dual carriageways for small scale gaming.

The last scale comparison is with some Games Workshop, Warmaster 10mm scale Empire Miniatures. I think the terrain looks very good with these scale miniatures and as soon as I have printed and painted a 3′ square I will definitely be trying out a Warmaster game.

My favourite game is Pulp Alley, and it occurred to me that these little removable disks would be ideal for mounting ploy points on. I took the STL file for the normal blank inserts (which has textured terrain on top surface) and flipped 180 degrees in my slicer, dropped it down in bed so textured terrain was beneath bed level, stretched it back out so I had a 4mm deep disk with a flat top. I printed a handful of those and have mounted some odd bits of terrain I had knocking around to use as plot point markers. These included some rubble, crystals and a sword set in a stone from Mantic Games Terrain box.
I hope that you have enjoyed this overview. I am planning to write a piece each month while I am working on this terrain. In September I am planning to add some rivers and roads to my set up. I have purchased the Rushing Rivers and Rambling Roads sets and am busy printing some new pieces to paint.
0 Comments