

I have been playing western skirmish games for just about as long as I can remember, at least the last 45 years or so. I can remember at about 15 going on a family summer holiday to the Isle of Wight and discovering a games shop with a gaming area where they were playing Old West skirmish games using 54mm plastic toy gunfighters. I brought a copy of the rules and some toy gunfighters (which I repainted, even back then) and introduced the game to my companions at the school wargames club. Since then I have scaled down to 28mm and have played many a game using Dead Man’s Hand, Pulp Alley, Combat Patrol, What a Cowboy and The Rules with No Name.
I have cowboy miniatures from a wide range of manufacturers, which I have collected an painted over the years, and as most western games have less than 10 figures per side, I don’t really need anymore, but since Great Escape Games started doing plastic multi-part gunfighters, I cant help every now and again adding to my collection. What I really like about them, that sets them apart is the huge variety of unique models that you can make from each kit. You no longer need to compromise. If you want a left handed female gunfighter with a bun in her hair wearing a waistcoat, you can build exactly that miniature. Great Escape Games have now launched a box of mounted gunfighters to match there Gunfighters I (Male) and Gunfighters II (Female) sets, so we now have the ability to make a mounted and an on foot version of any character that we want.
Mark from Great Escape Games kindly sent me a preview sprue of Mounted Gunfighters 2: The Ladies so I have put a YouTube Video review and spin video together and this simple painting guide using Games Workshop Contrast and Army Painter Speedpaint

I am painting a sprue of foot figures at the same time, as for me the ability to make a foot and mounted version of a character is one of the things that I love about this range. I like to start by spraying miniatures white. I use Hycote White Auto Primer spray. I buy 12 cans at a time, that way they cost less than £4 each, and I paint a lot of miniatures and terrain over a year!! You can of course use any spray primer you like for the job. When the primer is dry, I use a big (No 6) brush and apply a brown ink wash over the whole miniature. This could be GW Agrax Earth Shade or Army Painter Strong Tone or some similar brown ink. Once the ink is 100% dry (I like to leave overnight), the models are given a good drybrush with white acrylic using a make up brush. This gives a starting miniature with some existing shadow in recesses and highlight on raised areas to help speed paint do it’s job and it also makes it easier to see and understand the detail on the miniature.

I always like to start by painting flesh. One of the ladies is of African descent, so I have used Noble Skin for her hands and face. Crusader Skin is my go to flesh shade, but when I want miniatures to have a more tanned or weather-beaten appearance, I mix it 50/50 with Warrior Skin.

I painted the horses first, and decided to use Games Workshop Contrast Paints for the horse tones. I did each horse a different colour using Skeleton Horde, Fyreslayer Flesh, Wyldwood, Basilicanum Grey and Black Legion. I wanted one of the horses to be a Piebald so I carefully applied the Black Legion in patches leaving the already shaded and highlighted white base showing for the white areas. The grey coloured horse had it’s tail and main painted with Black Legion, all the other horses had there tails and manes painted with Basilicanum Grey.
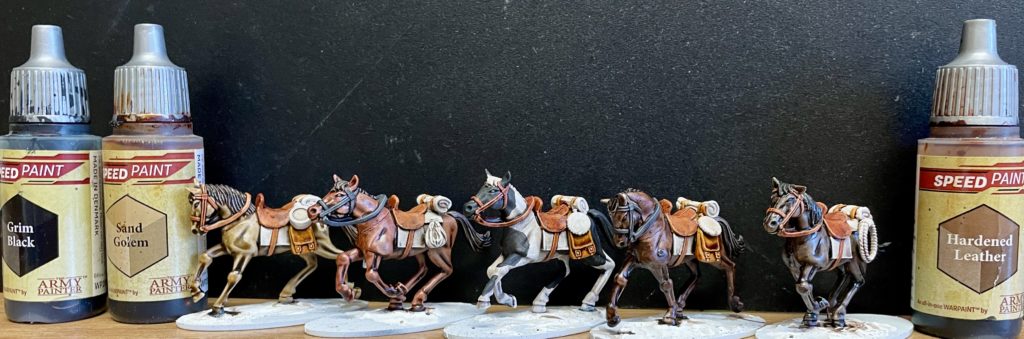
Saddle bags were painted using Sand Golem, saddles using Hardened Leather and bridles either Grim Black or Hardened Leather for a little variety.

I wanted to be able to reference the horses in a game by the colour of there saddle blanket. I am not gluing the riders on to the horses because I want to be able to take the rider model of and replace with the on foot version when they dismount and leave the rider less horse in position. Different colour saddle blankets make it easy to note which horse belongs to which character. I used Army Painter Maize Yellow, Beowulf Blue, Slaughter Red, Occultist Cloak and Burnt Moss, although really any colour would do!!

Horse hooves were painted using Desolate Brown which has a nice olive tone to it. Ropes and canteen straps were picked out with Bony Matter & Pallid Bone.

I then turned my attention to the Ladies. I first painted the main clothing colours on all of the models and then went back and as a batch painted boots, belts hats and equipment. I wanted the jeans on this model to look faded so I mixed Beowulf Blue 1:2 with some Speedpaint Medium to lower it’s intensity.

Pastel Lavender seemed a nice contrast for her blouse.

The 2nd model has waistcoat painted using Vallejo Battledress Brown, Army Painter Bright Red blouse and Tyrian Navy skirt.

Third model has skirt painted with Brownish Decay and jacket painted Occultist Cloak which is a deep bluish grey.

Fourth model, very straightforward. Dress painted Runic Grey.

For the last Gunfighter I decided to go for two different blue shades, Royal Robes for Skirt and Tyrian Navy which is a far darker blackish blue.

A wide range of browns and beiges were used for variety on the models boots, belts, hats and equipment. Vallejo Wasteland Brown is my favourite wood colour, so that was used to paint weapon stocks. Metal parts were painted using Army Painter Enchanted Steel.

The figures bases were painted using some Folk Art acrylic, Honey Brown. I find this a good base for under sand.

Once the paint on the bases was dry, I added a few Gamers Grass tufts and then painted PVA glue over the base and dipped in a pot of fine sand and tan coloured tile grout. A quick mist with water sets the tile grout, making a nice solid sandy texture.

Finally, all the figures were spray varnished. I use Hycote Matt Lacquer. Metal parts were given a brushed on application of gloss varnish to make them shine.
Handy Links:
YouTube video review and spins of my painted miniatures
Great Escape Games Plastic Kits and Dead Mans Hand rules in Sally 4th Webstore
0 Comments